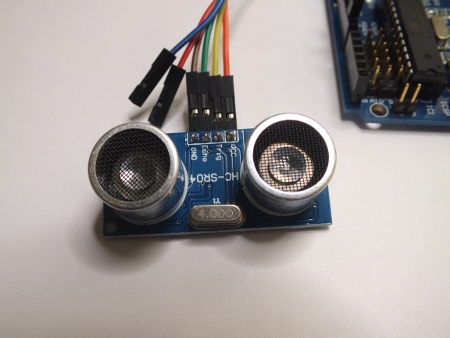
I bought some time ago HC-SR04 Ultrasonic Sensor Distance Measuring Module to play with ultrasound distance measurements with Arduino Duemilanove 2009 Atmega 328P SCM Board.

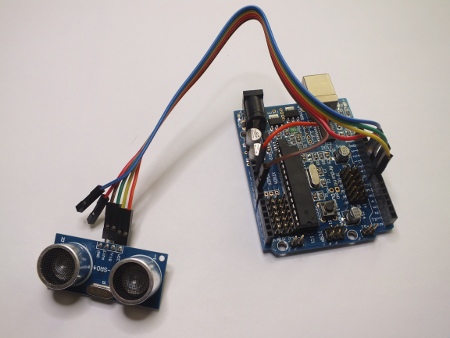
The working principle of the HC-SR04 Ultrasonic Sensor Distance Measuring Module when the module get trigger “start” pulse, it sends eight 40khz square wave pulses and automatically detect whether receive the returning pulse signal. If there is signals returning, through outputting high level and the time of high level continuing is the time of that from the ultrasonic transmitting to receiving. So the pulse length tells the time of flight from sensor to measured distance and back. The HC-SR04 Ultrasonic Sensor Distance Measuring Module was wired to Arduino board with Male to Female DuPont Breadboard Jumper Wires (pretty useful accessory for prototyping with Arduino).

Arduino programming environment contains Ping example made for an ultrasonic range finder from Parallax. It detects the distance of the closest object in front of the sensor (from 2 cm up to 3m). It works by sending out a burst of ultrasound and listening for the echo when it bounces off of an object. The Arduino board sends a short pulse to trigger the detection, then listens for a pulse on the same pin using the pulseIn() function. The duration of this second pulse is equal to the time taken by the ultrasound to travel to the object and back to the sensor. Using the speed of sound, this time can be converted to distance.
The HC-SR04 Ultrasonic Sensor Distance Measuring Module has a little bit different interface, because it had separate pins for trigger and echo. This means that I needed to modify the example source code (was not too hard).
Here is my modified code (over 90% based on Ping example that comes with Arduino IDE 1.0.5):
/* Ping))) Sensor
This sketch reads a PING))) ultrasonic rangefinder and returns the

distance to the closest object in range. To do this, it sends a pulse

to the sensor to initiate a reading, then listens for a pulse

to return.  The length of the returning pulse is proportional to

the distance of the object from the sensor.
The circuit:

* +V connection of the PING))) attached to +5V

* GND connection of the PING))) attached to ground

* Trigger connection of the PING))) attached to digital pin 7

* Echo connection of the PING))) attached to digital pin 8
http://www.arduino.cc/en/Tutorial/Ping
created 3 Nov 2008
by David A. Mellis
modified 30 Aug 2011
by Tom Igoe
by Tomi Engdahl
This example code is in the public domain.
*/
// this constant won't change. It's the pin number
// of the sensor's output:
const int pingTrigPin = 7;
const int pingEchoPin = 8;
void setup() {
// initialize serial communication:
Serial.begin(9600);
}
void loop()
{
// establish variables for duration of the ping,
// and the distance result in inches and centimeters:
long duration, inches, cm;
// The PING))) is triggered by a HIGH pulse of 2 or more microseconds.
// Give a short LOW pulse beforehand to ensure a clean HIGH pulse:
pinMode(pingTrigPin, OUTPUT);
digitalWrite(pingTrigPin, LOW);
delayMicroseconds(2);
digitalWrite(pingTrigPin, HIGH);
delayMicroseconds(5);
digitalWrite(pingTrigPin, LOW);
// The same pin is used to read the signal from the PING))): a HIGH
// pulse whose duration is the time (in microseconds) from the sending
// of the ping to the reception of its echo off of an object.
pinMode(pingEchoPin, INPUT);
duration = pulseIn(pingEchoPin, HIGH);
// convert the time into a distance
inches = microsecondsToInches(duration);
cm = microsecondsToCentimeters(duration);
Serial.print(inches);
// Serial.print("in, ");
Serial.print(", ");
Serial.print(cm);
// Serial.print("cm");
Serial.println();
delay(100);
}
long microsecondsToInches(long microseconds)
{
// According to Parallax's datasheet for the PING))), there are
// 73.746 microseconds per inch (i.e. sound travels at 1130 feet per
// second). This gives the distance travelled by the ping, outbound
// and return, so we divide by 2 to get the distance of the obstacle.
// See: http://www.parallax.com/dl/docs/prod/acc/28015-PING-v1.3.pdf
return microseconds / 74 / 2;
}
long microsecondsToCentimeters(long microseconds)
{
// The speed of sound is 340 m/s or 29 microseconds per centimeter.
// The ping travels out and back, so to find the distance of the
// object we take half of the distance travelled.
return microseconds / 29 / 2;
}
This code outputs lines with two numbers (inches and centimeters) separated by comma. The communications speed is 9600 bps. Everything worked well with TeraTerm. The output was two numbers per line separated with comma outputted at 9600 baud rare. The numbers tell the distance in inches and centimeters.
Now time to try to get some graphs. This could be down in many ways, for example using Processing like in Graph example, Realtime Plot of Arduino Serial Data Using Python, Graphing with Excel or use application specifically made for this like SerialChart.
SerialChart is an open source application for charting data sent via RS-232 port in real time. I had used the software earlier successfully, read the documentation and checked SerialChart Tutorial, but for some reason I could not get data from Arduino that was mapped to COM11. I finally found that I had the same issue issue that was mentioned at Serial chart says that the com port is busy when its not page:
This a problem that comes from the qt serial library. So I will not be fixing that but as a workaround I want to let you know that you’re not stuck with high-numbered ports that Windows assigns , you can change them to something lower than 10, for example COM7 , COM5
I configured Arduino USB serial port number to COM2 and now SerialChart worked well.
SerialChart configuration I used:
[_setup_]

port=COM2

baudrate=9600
width=1000

height=201

background_color = white
grid_h_origin = 100

grid_h_step = 10

grid_h_color = #EEE

grid_h_origin_color = #CCC
grid_v_origin = 0

grid_v_step = 10

grid_v_color = #EEE

grid_v_origin_color = transparent
[_default_]

min=-1

max=1
[Field1]
color=gray
min=0
max=255
[Field2]
color=red
min=0
max=255
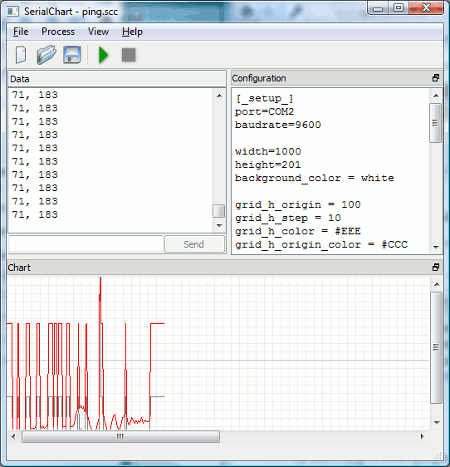
Here is the output I got with SerialChart program:

Now I can visually see what the sensor senses and also see the numeric values.
73 Comments
Tomi Engdahl says:
8 Ultrasonic Sensors Combine to Give Your Robot a Wide View
https://blog.hackster.io/8-ultrasonic-sensors-combine-to-give-your-robot-a-wide-view-29f63d6fc056
Tomi Engdahl says:
Detect objects with this DIY “radar” display
https://blog.arduino.cc/2019/03/05/detect-objects-with-this-diy-radar-display/
Tomi Engdahl says:
This setup uses four ultrasonic sensors to drive an LED matrix, while collecting data in Excel.
LED Architectural Machin © GPL3
https://create.arduino.cc/projecthub/Mukhin/led-architectural-machin-bb67ba
Architectural machine for controlling a diode matrix ws2812b with 4 connected ultrasonic sensors and distance data collection in Excel.
Tomi Engdahl says:
Heading back to the office? Watchzi is a simple social distancing device for your desk.
COVID-19 Simple Friendly Social Distance Robot Watchzi © GPL3+
https://create.arduino.cc/projecthub/draakje156/covid-19-simple-friendly-social-distance-robot-watchzi-8f2268
Watchzi measure the distance between it and the approaching persons, gives warning with light and sound when 1.5 meters is exceeded.
Tomi Engdahl says:
https://www.hackatronic.com/ultrasonic-sensor-without-arduino-using-555-timer/
Hey folks, have you used an ultrasonic sensor in your projects! Do you know how it works? In this project, we will use an ultrasonic sensor without Arduino for object detection. We will interface ultrasonic sensor with a 555 timer to control a DC motor. How ultrasonic sensors work?
Tomi Engdahl says:
Building a sonar sensor array with Arduino and Python
Estimate distance and position of solid objects using multiple low-cost ultrasound sensors.
https://towardsdatascience.com/building-a-sonar-sensor-array-with-arduino-and-python-c5b4cf30b945
In this article we are going to build from scratch a sonar array based on the cheap and popular HC-SR04 sensor. We will use an Arduino microcontroller to drive and read the sensors and to communicate to a host computer using serial communication. Here is the working code for the full project however I recommend you to follow the steps in the article to understand how it works and to customize it for your needs.
The HC-SR04 is a very popular ultrasound sensor usually used in hobby electronics to build cheap distance sensors for obstacle avoidance or object detection. It has an ultrasound transmitter and receptor used to measure the time-of-flight of an ultrasonic wave signal bouncing against a solid object.
Tomi Engdahl says:
Multiple Object Detection with a Single HC-SR04 Sensor
Analog output processing lets a fixed HC-SR04 sensor detect multiple objects.
https://www.hackster.io/news/multiple-object-detection-with-a-single-hc-sr04-sensor-a30aa9659ded
Tomi Engdahl says:
Ultrasonic Radar Can Detect Multiple Objects at Each Ping © GPL3+
With a small modification of the ultrasonic sensor module, this radar can detect multiple objects at each ping.
https://create.arduino.cc/projecthub/mircemk/ultrasonic-radar-can-detect-multiple-objects-at-each-ping-7a0f26
Tomi Engdahl says:
Speed Measurement Using HC-SR04 Ultrasonic Sensor © GPL3+
On this project I will show you how to measure the speed of movement of an object using HC-SR04 ultrasonic sensor.
https://create.arduino.cc/projecthub/mircemk/speed-measurement-using-hc-sr04-ultrasonic-sensor-e132b7
Tomi Engdahl says:
A Phased-Array Ultrasonic 3D Scanner From Scratch
https://hackaday.com/2021/05/15/a-phased-array-ultrasonic-3d-scanner-from-scratch/
Tomi Engdahl says:
DIY 360° Arduino radar with 2xHC-SR04 sensors
This is an Arduino-based ultrasonic radar. In this case, it is interesting that are used two sensors to scan the entire 360-degree space, and you don’t have the problem of cables getting tangled around the servo.
Detailed instructions, schematic, and code at:
https://youtu.be/RcrOuO8s4H4
PCBGOGO
Tomi Engdahl says:
This DIY sonar system uses a pair of ultrasonic sensors to scan the an 360° space.
360° Arduino Radar with 2xHC-SR04 Sensors © GPL3+
https://create.arduino.cc/projecthub/mircemk/360-arduino-radar-with-2xhc-sr04-sensors-eb0053
In this case, it is interesting that are used two sensors to scan the entire 360-degree space.
Tomi Engdahl says:
Distance Measure with Ultrasonic Sensor ….full detail and code click the link below
https://techatronic.com/ultrasonic-range-finder-using-arduino-lcd/
Tomi Engdahl says:
Radar system using ultrasonic and Arduino….
more details and code
https://techatronic.com/radar-using-arduino-ultrasonic-sensor/
Tomi Engdahl says:
Ultrasound distance sensor
https://m.aliexpress.com/item/1005003683104654.html?gatewayAdapt=Pc2Msite
Tomi Engdahl says:
https://create.arduino.cc/projecthub/Arduino_Genuino/ultrasonic-range-detector-using-arduino-and-us-016-39f583
Tomi Engdahl says:
Phased array sonar
https://hackaday.io/project/188121-phased-array-sonar
DIY sonar with 16 channel receiver (up to 24) and active transmitter with 1 (up to 4) channels
Tomi Engdahl says:
https://hackaday.io/project/188121-phased-array-sonar
Tomi Engdahl says:
https://www.creativefieldrecording.com/2020/08/05/article-ultrasonic-parabolic-experiments/
https://sanken-mic.com/en/product/product.cfm/3.1000400
https://vintageking.com/sanken-co-100k-100khz-super-wide-range-microphone
Tomi Engdahl says:
DIY sonar scanner (practical experiments)
https://www.youtube.com/watch?v=z4uxC7ISd-c
Starlink, Medical Ultrasound, 5G and my DIY sonar scanner have one thing in common: Phased arrays. Phased what..? My practical experiments convey the physics behind the manipulation of waves in a playful manner. The result is a real DIY sonar scanner. Check it out!
Tomi says:
DIY Radar With Ultrasonic Sensor And Chat-GPT Generated Arduino Code | Coders Cafe
https://www.youtube.com/watch?v=o7DMHJKhpws&t=14s
Tomi Engdahl says:
DIY Arduino ultrasonic Sonar – Radar on TFT display
This is a very simple, easy to make, visually effective, and self-contained device intended for both beginners and more advanced DIYers.
Detailed video, instructions, schematic, and code at:
https://youtu.be/XOZAGRH_6hA